Tag

Autodesk

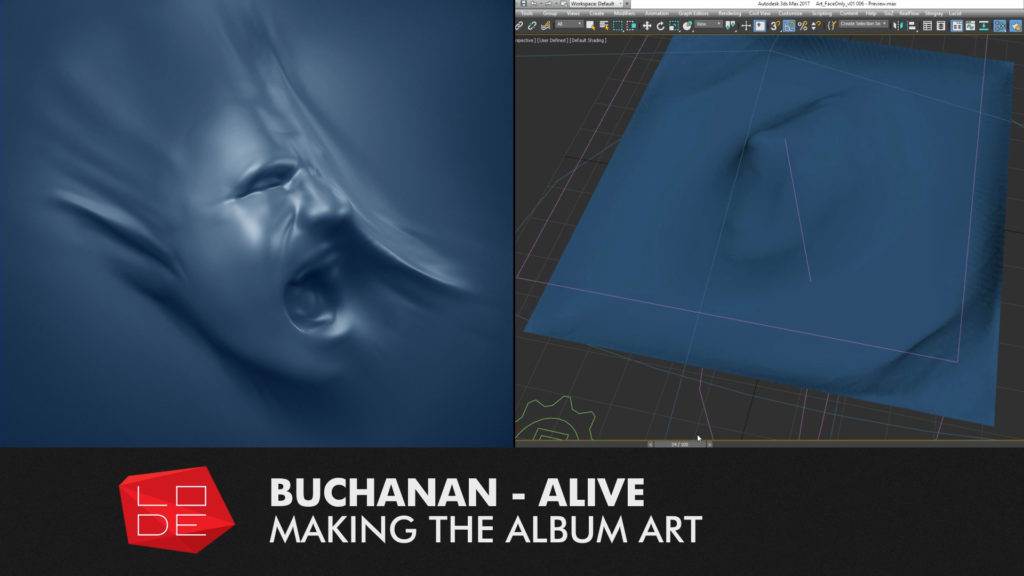
Buchanan Alive Album Cover 3D Design

Making-of Video Buchanan’s “Alive” album cover

By My Portfolio, TutorialsNo Comments

I’ve put together a short “making-of” video for Buchanan’s “Alive” album cover. Alive was released in the last week of October 2016 and I created the album cover which features lead singer Josh Simon’s head twisting under the pressure of a vacuum sheet! Josh wanted it to be cast blue – looking almost like an invert of the Pressure in an Empty Space album.

The video details the different steps that went into the process of creating the artwork.

Alive is available now on iTunes, Apple music and Spotify. You can learn more about the album here on the band’s official facebook page. This live album is linked to the recent “Pressure in an Empty Space” Studio album released by the band. I have more information on “PIAES” here on my LODE portfolio.


Alive Album Art – Process breakdown.

Here is an overview of my process when creating the album cover. More information is available in the video linked above.


Pre-Production

I went through a big phase of planning, brainstorming and pre-production with Josh Simons before we settled on the visual approach to “Pressure in an Empty Space” and how it would carry over to “Alive”.

Photogrammetry shoot

[image title=”Buchanan Alive Album Cover – Photogrammetry Shoot” width=”544″ height=”306″ align=”center” lightbox=”true” group=”BUCH” icon=”zoom”] http://thelode.com.au/wp-content/uploads/2016/11/02_Photogrammetry.jpg [/image]

Production began with a Photogrammetry session with Josh. This is where multiple photos are taken of a subject and the computer is able to reconstruct a digital model of the scene.

Face reconstruction

[image title=”Buchanan Alive Album Cover – Mesh Reconstruction” width=”544″ height=”306″ align=”center” lightbox=”true” group=”BUCH” icon=”zoom”] http://thelode.com.au/wp-content/uploads/2016/11/03_FaceReconstruction.jpg [/image]

This was my first photogrammetry attempt, and so the results were not perfect. I learnt what not to do next time! The resulting model was quite distorted due to many factors including:

[list style=”list_1″] [li]Not enough photographs of the subject [/li] [li]Some photographs were blurry or out of focus
[/li] [li]Only 1 camera was used, so it was inevitable that the subject would move over the course of the shoot. I should have got Josh to lean the back of his head up against the plaster wall to keep it steady and remove clutter from the background[/li] [/list]

Sculpting

[image title=”Buchanan Alive Album Cover – Sculpting in Zbrush” width=”544″ height=”306″ align=”center” lightbox=”true” group=”BUCH” icon=”zoom”] http://thelode.com.au/wp-content/uploads/2016/11/04_Sculpting.jpg [/image]

The digital version of Josh’s face was missing a lot of detail, but it was still great reference for the overall form and proportions, and so I built upon an auto-retopologised version of this model and used my original photos as reference while I sculpted a digital bust myself.

Scene setup

[image title=”Buchanan Alive Album Cover – Preparing mesh for simulation” width=”544″ height=”306″ align=”center” lightbox=”true” group=”BUCH” icon=”zoom”] http://thelode.com.au/wp-content/uploads/2016/11/05_SceneSetup.jpg [/image]

Once the face was ready I did some render tests and then prepared a capped version of the head optimised for dynamic simulation. I only needed the head – not the shoulders, etc. I wanted the topology of the model to be clean so as not to cause issues during dynamic simulations. I wanted to make the head look like it was being compressed under the pressure of a vacuum seal! I used the Lucid plugin for 3ds Max to achieve this. Lucid is a very versatile simulation system created by Ephere.

Simulation of cloth on Face

[image title=”Buchanan Alive Album Cover – Lucid Plugin for 3DS Max” width=”544″ height=”306″ align=”center” lightbox=”true” group=”BUCH” icon=”zoom”] http://thelode.com.au/wp-content/uploads/2016/11/06_Simulation.jpg [/image]

I then did some tests in how to set up my scene for Simulating. I sat the digital face on a flat surface & created a digital sheet that would be draped on top. I placed a large “Spherical Gravity” spacewarp below the face. It acted like a black hole – a vacuum that would suck all air in the area into its centre.

This, plus some gravity, wind and turbulence caused the sheet to try and push “through” the face as best it could – however the face would not let it. I found this was a quick way to get predictable results, and the Lucid plugin performed superbly.

Detail Sculpting

[image title=”Buchanan Alive Album Cover – Sculpting HiRes Mesh in Zbrush” width=”544″ height=”306″ align=”center” lightbox=”true” group=”BUCH” icon=”zoom”] http://thelode.com.au/wp-content/uploads/2016/11/07_Sculpting.jpg [/image]

After getting a satisfactory result (it took about 5 different simulation attempts to find the right settings), I exported one “Frame” of the cloth simulation to Zbrush. I also sent the underlying head/ground geometry to use in projection painting if needed. I then spent my time sculpting in extra details specifically where I wanted them, stretching and warping the cloth further, and getting the final desired look.

Exporting final high-res mesh

[image title=”Buchanan Alive Album Cover – Scene setup in 3ds Max and Vray” width=”544″ height=”306″ align=”center” lightbox=”true” group=”BUCH” icon=”zoom”] http://thelode.com.au/wp-content/uploads/2016/11/08_ExportingHiRes.jpg [/image]

The original Cloth had been planar UV-Mapped from the top, so it had correct UV co-ordinates – stretching where they naturally should. In the end I didn’t rely on UV co-ordinates in my shaders and the setup was very simple. I exported the Hi-Res mesh from Zbrush to 3ds Max using Decimation Master and Mesh Lab.

I setup my scene for rendering, first the “blue” Shader, then tweaked cameras and lights until I settled on a look that worked. I then spent time with Josh Simons to tweak all settings before the final render.

Final output

[image title=”Buchanan Alive Album Cover – Final Output” width=”544″ height=”306″ align=”center” lightbox=”true” group=”BUCH” icon=”zoom”] http://thelode.com.au/wp-content/uploads/2016/11/09-final-output.jpg [/image]

The scene was rendered in Vray 3.4 in 1 pass, with all required elements – DiffuseFilter, Reflection, Specular, GI, etc. All elements were then re-assembled in Photoshop to do the final Composite and grade. The Zdepth Mask was used to affect only the areas of the face that “Stick Out” of the main cloth. A final colour grade was applied and the image was flipped horizontally before being exported for print and digital use. The artwork was rendered at a resolution of around 5, 400 x 5,400 pixels to retain resolution when printing or scaling.

Conclusion

Every project I’ve worked on with Buchanan has been varied, challenging and extremely exciting, making use of many techniques and technologies, this cover was no exception. In the future I’ll create a video similar to this for the Pressure in an Empty Space cover. I hope this breakdown video and accompanying text post has been interesting and helpful.
 

Michael Wentworth-Bell in Hong Kong

Visiting Hong Kong

By Business News, Digital Lode, InspirationNo Comments

I’m Currently spending 2 weeks in Hong Kong and, as always, loving my time here!

[image title=”Returning to Hong Kong in May 2014 with Ivy” width=”544″ height=”332″ align=”center” lightbox=”true” group=”HongKong2014″ icon=”zoom”] http://thelode.com.au/wp-content/uploads/2014/05/Michael_Wentworth_Bell_Hong_Kong.png [/image]

My life journey is tied to Hong Kong in a very special way – it has been a turning point in studies, my career, and where I met the love of my life.

Autodesk Panorama competition – 2009

In 2009 myself and 2 friends entered the first ‘Autodesk Panorama‘ competition, creating a short 2 minute 3D animation in 3 and a half weeks to meet the deadline. We were extremely lucky to have been chosen as Australian finalists.

We were flown by Autodesk as Team Belfast with the other Australian finalist team to Hong Kong where we got to attend a 4 day intensive boot camp with other finalists – Students from 11 countries.

[image title=”Group Shot of the Panorama Boot Camp entrants, organisers and mentors.” width=”544″ height=”306″ align=”center” lightbox=”true” group=”HongKong2014″ icon=”zoom”] http://thelode.com.au/wp-content/uploads/2014/05/Autodesk_Panorama_Competition_2009.jpg [/image]

The boot camp was mediated and mentored by 4 industry professionals including Markus Kurtz from Rhythm and HughesDaniel Thompson from Rising Sun Pictures and Benjamin Huber from Industrial Light & Magic / Lucasfilms.

Meeting Ivy

After the competition, we decided to stay on in Hong Kong for an extra 5 days – it was the first time the 3 of us uni mates had ever been overseas. it was during this time that I met an acquaintance who became a pen-pal, friend, girlfriend, is now my fiance and next year will be my wife.

[image title=”Visiting Hong Kong Disneyland with Ivy in 2011″ width=”544″ height=”363″ align=”center” lightbox=”true” group=”HongKong2014″ icon=”zoom”] http://thelode.com.au/wp-content/uploads/2014/05/Michael_Wentworth_Bell_Disneyland.jpg [/image]

The Panorama 2009 experience changed my life completely. I have since finished my Uni degree and am working in the 3D animation industry.With Ivy, i’ve continued to return to Hong Kong once a year, Staying around 1-6 weeks each time.  One of my recent trips to Hong Kong was shared with my sister and best mate James, and my parents have travelled to Hong Kong this time to spend time with Ivy’s family. It is the first time my father has left Australia!

[image title=”‘Bliss’ – one of a series of mini-planet panoramas I have made while in Hong Kong” width=”544″ height=”544″ align=”center” lightbox=”true” group=”HongKong2014″ icon=”zoom”] http://thelode.com.au/wp-content/uploads/2014/05/Michael_Wentworth-Bell_Hong_Kong_Stanley.jpg [/image]

I absolutely love the bustling and extremely busy Hong kong. The people, the food, amazing transport and architecture of this insane mecha-city.

PMQ Artist Hub, Hong Kong

Also a big fan of the art community in Hong Kong. This trip, Ivy and I have visited the newly opened PMQ artist’s hub located in Central, Hong Kong.

[image title=”‘The PMQ Artist hub in Hong Kong” width=”544″ height=”813″ align=”center” lightbox=”true” group=”HongKong2014″ icon=”zoom”] http://thelode.com.au/wp-content/uploads/2014/05/PMQ_Hong_Kong_2014.jpg [/image]

Still early days for the PMQ precinct, but it is a state of the art setup with some very interesting tenants and a  lot of great events planned later this year – i’m very annoyed that i’ll be missing out!

Art Basel Hong Kong 2014

We’ve also visited the Art Basel exhibition which was mind-blowing in its sheer scale. 2 absolutely massive exhibition spaces with thousands of artworks on display from all over the world.

[image title=”Ivy and I at Art Basel Hong Kong 2014″ width=”544″ height=”716″ align=”center” lightbox=”true” group=”HongKong2014″ icon=”zoom”] http://thelode.com.au/wp-content/uploads/2014/05/Art_Basel_Hong_Kong_2014.jpg [/image]

Some very truly inspiring pieces amongst some of the more tame and conventional work. The best work was coming out of Beijing and Korea.

Local Industry

I am always trying to keep up-to-date with what the local HK studios are producing in the area of 3D animation, visualisation and broadcast. Particularly impressed with FATFace and Treehouse studio.

I’ve had a great 2 weeks in Hong Kong this year and look forward to returning in aroud a year’s time. To any HongKongers in the 3D Animation / Design industry, please do hit me up if you visit Melbourne, Australia sometime!

W.I.W.O: Week 35 & 36 – Melbourne Zoo Underwater Exhibit

By Current Projects, What I'm Working on (WIWO)No Comments

I’m creating 3D animated content for an exhibit at the Melbourne Zoo! Reel Pictures & Mal Padgett design are putting together an update for a 6 minute large-screen video about Australia’s coast and recycling. I’m helping to create 2 minutes of animation for the exhibit.

The video must go live on the first week of school holidays (very, very soon!) but we are confident we will finish the content in time. I’ve spent the last week or so creating the underwater environment.

I have saved a lot of time thanks to a tutorial created by Michael McCarthy- 2011 Autodesk 3DS Max master and one of my many heroes in this industry. For a recent tutorial, he created an underwater enivornment that looks fantastic and renders extremely quickly using Mental Ray. I have used this idea as my starting point for our underwater scene. It’s my first project using Mental ray in a very long time, and i’ve been reminded how good mental ray actually is. It hasn’t been developed properly in a few years (though that may change over the next couple of months), and I still believe vray is far better, but mental ray is proving to be a much better solution for this particular job.


I’ve also spent a few days over these last 2 week helping Alf Kuhlmann put together a new website for Reel Pictures, the first update in a few years. The new Reel Pictures folio is only just started, with many more projects to be added and finished, but already there is so much awesome work on there.

I’ve also created an updated poster design for Moonee Valley City Council’s Fling Fest Event.

[image title=”Fling Fest 2012 Poster Design by Michael Wentworth-Bell” width=”544″ height=”757″ align=”center” lightbox=”true” group=”wiwo2012week35″ icon=”zoom”] http://thelode.com.au/wp-content/uploads/2012/09/Fling-Fest-2012-Poster-Design-Michael-Wentworth-Bell.jpg [/image]

I created the artwork for this poster in Photoshop and 3DS max and rendered it with Vray and After Effects. It was a lot of fun and i’m going to create a new page on my portfolio for this project soon.

The next 2 weeks will be quite busy with the Underwater animation job, but it’s a lot of fun (lots and lots of Particle Flow Simulations) and I can’t wait to see how it turns out!

[divider_line_padding] I try to create a quick journal entry at the end of each week that covers the projects, events and highlights of the past 7 days. These weekly blog posts are known as the ‘WIWO’ Series
(What I’m Working On).
[divider_line]